21 Mar

ORACLE

Posted in Creativity, DIY MFA, Process, Writing

You’ve heard me mention the ORACLE in the past, but today I thought I would give you a more detailed look at what the ORACLE really is. First things first; the ORACLE stands for:
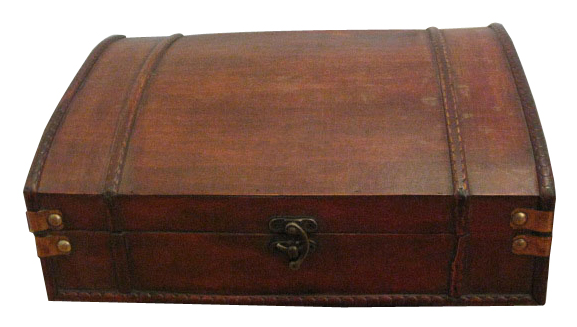
Outrageous
Ridiculous
Absurdly
Creative
Literary 
Exercises

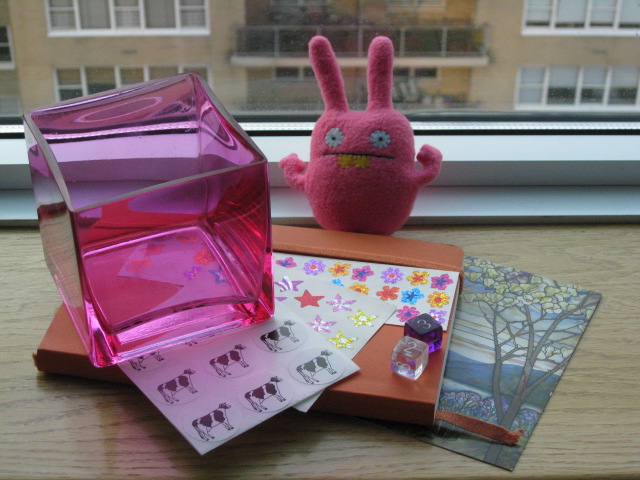
I store my ORACLE in a treasure chest because every time I visit, I like thinking that I’m going to discover a little piece of treasure.  What’s inside this box of tricks?  I’ll show you:

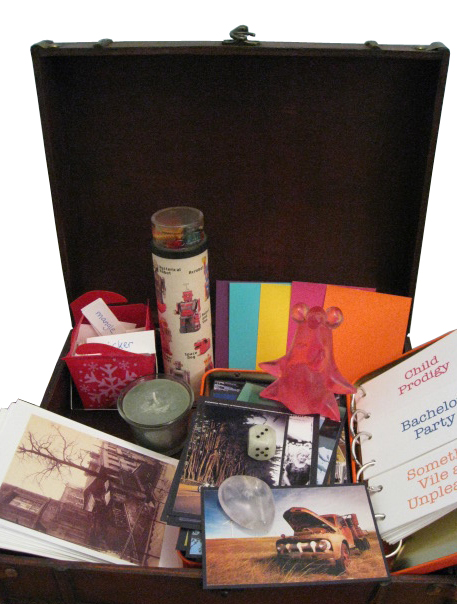
These are just a few things that live in (or near) the ORACLE.  The box is so jam-packed with stuff that some things no longer fit in the ORACLE proper and have been moved to various annex locations.  There are also some additional items not show in the picture, including: mood playlists on my iPod, a deck of cards (for playing solitaire), and of course the Idea Bank.

Why do I keep bringing up this ORACLE idea?

Because the ORACLE will be central to the structure of DIY MFA 2.O.  Just like DIY MFA is about giving you the tools to build a satisfying and productive writing life, the ORACLE is about building a diverse skill set for generating ideas.  Sure, I could give you prompts or exercises from my own ORACLE, but at the end of April, where would that leave you?  Instead, I’d rather give you tools and tricks I’ve developed that will help you come up with your own infinite bank of ideas.  That way, you’ll always have somewhere to turn if your creative well goes temporarily dry.

But before get carried away, we need to talk about some ORACLE basics.  This week, in preparation for DIY MFA 2.O, I’ll be doing a post series on the ORACLE.  Posts will include:

  • 5 Principles for Generating Ideas
  • 4 Results You Can Expect from the ORACLE (and I’ll let you in on which one will be especially important to DIY MFA 2.O)
  • The DIY MFA 2.O Schedule

In the meantime, I want to hear from you.  I showed you what’s in my writing toolbox, now show me yours, ‘k?  What are some things in your writing toolbox that you simply cannot do without?

3 Comments »

20 Mar

DIY MFA: Writing Sprints and a Marathon

Posted in Blog, DIY MFA, Info, Tips

Today I wanted to give you all an update on DIY MFA.  Over the next two weeks , I’ll be doing a few lead-up “DIY MFA Orientation” posts, explaining some background (especially important if you’re new to DIY MFA and didn’t participate in the fall).  A week from this Monday, I’ll be opening sign-ups for DIY MFA 2.O and I’ll be announcing a sooper-seekrit, sooper-exciting giveaway.

But first off, I wanted to talk about two things that I’m really excited about but are new to DIY MFA this time around.  These are: writing sprints and a writing marathon.

Every Saturday during April, I’ll be doing DIY MFA Writing Sprints.

Here’s how it works:  I’ll be blocking out a chunk of time (between one and three hours) each Saturday in April to make a mega-push on my writing.  Sure, this might mean making some sacrifices–like waking up an hour, or two, or three earlier than usual (ugh)–but we writers need to get used to making sacrifices for our work.  These sprints will be good practice.

I’m telling you about these sprints because I’d love for you to join me!

I’ll be making some iggilicious badges that you can post on your blog to show off your awesome weekend accomplishment.  Also, you can use the twitter hash tag #diymfa to share how long or how much you wrote.  If you don’t tweet, you can also share your results in the comments for that day’s DIY MFA post.  Cheer-leading other DIY MFA tweeps is strongly encouraged.  The idea is to create an online community of DIY MFAers writing together and encouraging each other even if they’re in totally different locations across the globe.

On Sunday May 1st, to celebrate the end of DIY MFA, I’ll be doing a Writing MARATHON.  This idea was inspired by Natalie Goldberg’s Writing Down the Bones but is a little bit different.  Rather than committing to a specific time/place, writers can commit either to a full marathon (~6 hours) or a half marathon (~3 hours), then write those hours whenever or wherever during that day.

I myself will camp out somewhere in NYC and write ALL DAY.  I’ll post where I’m writing so that folks in NYC can come by and join even if it’s just for a short sprint.  Also, like with the sprints, people are encouraged to tweet their progress and encourage each other to make it through the marathon.  At the end of the day, we’ll have a post-marathon, post-DIY MFA twitter party!

So my question for you is: are you in?

12 Comments »

16 Mar

Idea Bank

Posted in Creativity, DIY MFA, Process, Writing

One of the things you’ll need to collect for DIY MFA 2.O is an Idea Bank.  The bank itself can take any number of shapes: a cookie tin, a shoebox, a jar, a small vase.  I’m using this pink cube vase that I found at a thrift shop.

How it works: Write down and any ideas you can’t work on right now and deposit them in the Idea Bank so that they’ll be there for you when you need them later on.  You can keep adding to your stash or taking from it over time.

How is this different from the ORACLE?  The ORACLE is where you keep your creativity tools.  The Idea Bank is where you store the unused fruits of your creativity.

How I use my Idea Bank: I carry slips of paper with me so I can jot down ideas on the go.  When I think of a funny line, prompt or idea for a story, I write it down, fold it up and when I get home I put it in the bank.  Then when I need a creative kick in the pants, I pull an idea out of the bank at random and use that to fuel my writing.

Note that there are no limitations or rules about what you can put in your Idea Bank. In addition to folded pieces of paper, you can also use put in pictures or any other objects that could spark a story or idea.

Hint: If you’re planning to do StoryADay in May, start building up a store of ideas in the bank.

Think about it: if you come up with one good prompt every day between now and April 30, you’ll have more than enough story ideas to get you through May.  Then when you get to the challenge, you can focus on writing and not on thinking up ideas.

Even if you don’t do a month-long challenge like StoryADay, you can still use the Idea Bank to store your ideas until you have time to work on them.  Right now, I’m only alloted two works-in-progress (otherwise I’d have way too many started projects and none that are ever finished).  I use the Idea Bank to store concepts I don’t have time for right now but would like to come back to later.

Have you found an Idea Bank for your DIY MFA 2.O?  What is it?  How do you plan to use it?

6 Comments »

14 Mar

DIY MFA: School Supplies

Posted in DIY MFA, Process

In preparation for DIY MFA 2.O, I’d like you to go shopping for school supplies.   While you don’t need to restock your school supplies altogether, you should treat yourself to a few small things.  You’re starting on a big project and by taking time to put together a couple of tools and supplies, you show that you’re serious and are making an investment in your writing.

So what do you need to collect before you start?  Here’s a photo of my DIY MFA 2.O kit.

Notebook:  The ecosystem notebooks are nice because they’re environmentally friendly and come in pretty colors.  I would rather write on unlined paper, but that’s a personal preference.  I also like writing inspiring quotes in the inside front and back covers for encouragement.

Pen: My favorites are Pilot Varsity in dark blue (not shown above) because I want to be able to see comments I write on manuscripts easily and dark blue is also easy on the eyes.  I buy these pens in bulk online.

Postcard:  I keep a postcard of a Tiffany stained glass window with my notebook at all times.  The image is what I think of as my imaginary ideal writing space.  If I’m writing in a noisy cafe or crowded subway, I can look at the picture and imagine myself in a peaceful writing space.  On the back of the postcard, I’ve written three mantras.  No matter what obstacle I’m running into with my writing, one of these mantras usually helps.  They are:

“No guts, no glory.”
“Keep the drama on the page.”
“Stop thinking; just write.”

Stickers:  Actually, it doesn’t need to be stickers, per se, but you do need some sort of reward-system.  I give myself a sticker for a writing job well done and to celebrate that small victory but oh-so-important victory that comes with a good writing session.

Dice:  Currently, this is my favorite writing tool.  I carry two dice with me at all times.

Mascot:  I think every writer needs a mascot.  It’s like having a little piece of your workspace with you even if you’re “writing out.”  It also means you have company while engaging in that lonely craft of writing.  The mascot is also a reminder that you are awesome.  After all, how many people actually have mascots?

Brain Bank:  I’m going to use the pink vase-cube in the picture, but you can use anything you like.  The only requirement for this item is that it be big enough to store your ideas.  Some ideas: piggy bank, cookie tin, small basket, cookie jar, even a shoe box.  I’ll talk about what to do with your Brain Bank later this week.

As you assemble your writing tools, remember to keep things as portable as possible, so you can write on the go.  The only one that might be non-portable is the Idea Bank, but you could make it portable by using a pencil case or coin purse for it.  Here’s a picture of my portable writing kit.

Now you tell me: what other supplies are must-haves in your DIY MFA 2.O toolkit?

Comments Off on DIY MFA: School Supplies

Iggi & Gabi - All rights reserved © 2010-2011

I am a HowJoyful Design by Joy Kelley