20 Apr

Writing Rituals

Posted in Creativity, DIY MFA, Process, Writing

Today, I’d like to talk about writing rituals–you know, those little things we all do to get us in that writing mood.

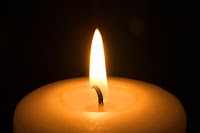
What are writing rituals?  They can be anything, as long is it sets the mood for writing.  I read once about a writer who literally wears different hats when she’s writing or editing.  Another writer I’ve heard of lights a candle when it’s writing time.  The writing rituals can be as simple as a turning on your iPod or using a specific pen or notebook.

My writing ritual is that I always use an unlined notebook and a fountain pen.  Something about writing with a fountain pen makes me feel like I’m channeling the great women writers of old, like Jane Austen or the Bronte sisters.  I also have certain playlists I listen to for different projects.  Right now I’m listening to the GLEE soundtracks because I can always use more glee in my life.

Why are rituals important?  Rituals signal to your brain “OK it’s writing time now.”  Just like having a bedtime routine can help kids get in the mindset of going to sleep, writing rituals tell your inner writer that it’s time to get in that writing frame of mind.  Writing rituals are also a great way to pamper your inner writer a little bit.  Scented lotion can be soothing, a pretty potted plant on the window sill can make you smile, a favorite poem or reading passage can inspire the writer within.  Whatever you choose, having a small writing ritual can help set the mood for writing.

What if your ritual becomes too routine?  Every so often, it’s good to shake things up.  Break your routines and do the exact opposite of your writing ritual.  This can be a challenge, because stepping outside our comfort zones can be uncomfortable and scary.  But a healthy dose of fear can be energizing–exciting even–so don’t shy away from breaking your rituals now and again.  Take a risk!

Why it works:  All writing is the act of making rules, then shaking them up.  When we write, we establish rules for our readers and the reader gets lulled into a comfort zone with the story.  When we shake up those rules (give the story structure a twist, introduce a new character, add a new plot element) it gets the readers’ attention.  They sit up and start listening again.  The same is true for our inner writers.  When we shake up our writing “rules” it grabs our inner writer’s attention and helps it engage with the work again.

Homework: If you don’t already have a writing ritual, think of something that would help get you in the writing mood and do it today.  Establish a ritual so that in a couple of weeks, when you break it, your writer will respond.

If you do have a ritual already, I want you to break it today.  Do something outside your routine, something exciting and maybe a little bit daring.  (I know some of you already did this for the first writing sprint, but that was weeks ago and it’s time to shake things up again.)  Remember, it doesn’t have to be a huge change; it can be just one small, meaningful thing.

Please share in the comments because I’m dying to know: Do you have a writing ritual? What is it?  What small thing did you do to break out of your comfort zone today?

13 Comments »

19 Apr

True Colors

Posted in Art, Creativity, Design, Inspiration, Writing

As you might have noticed, I’m really into design.  A graphic designer and product manager in a past life, you could say I’m a little bit obsessed with clean lines and balanced designs.  I love problem-solving so that form and function work together seamlessly.  One of the areas that most fascinates me in design is color theory and color symbolism.  I find it remarkable that certain colors seem almost to have certain personalities or identities.  Much like characters in a story.

Colors and their meanings:

Certain colors have intrinsic meaning.  Red means “stop” or “warning.”  Orange is an attention-grabbing color, green suggests growth and life, and blue generally has a calming influence.  Even before we add the layers of other influences, these colors already have a certain symbolism inherent in the color itself.

Traditions and cultures help shape symbolism.  In Western culture, the color white implies innocence and purity while in other cultures it is actually the color of mourning.  The phrase “green with envy” has added a different layer of meaning to the color.

Combining colors lends nuance.  Blue alone might symbolize peace and calm, but add red and yellow, and you get the primary colors which imply youth.  Replace the yellow with white and you get a patriotic color combination.  When you pair colors together, their meanings can change or acquire nuance.

A little color theory:

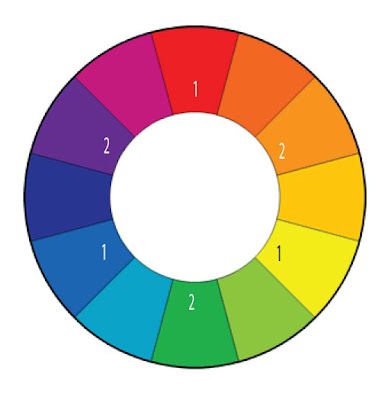
Red, Yellow and Blue are the primary colors.  They are called primary colors because you cannot mix any other colors together to get these three.

Note: red, yellow and blue are primary colors for pigment.  When you’re talking about color and light, the primaries are actually red, green and blue but that gets us into crazy physics stuff and I’m not going there.

Orange, Green and Purple are secondary colors.  They are called secondary because you can make them by mixing only two primaries.

See the color wheel below for primary and secondary colors.  Primaries are marked with a 1 and secondaries are marked with a 2.

Image Credit Tiger Color: Color Lab

Opposites provide good contrast.  Colors that are opposite each other on the color wheel are called complementary colors because they complement each other well and provide contrast.  Each of the primary colors has a secondary color as its complement.

But, what does this have to do with writing?

Color can set a mood.  It can inspire a feeling or set the tone for a piece of writing.  You can use individual colors or a color scheme to capture the essence of your story without words.  Think of it as a wordless summary.

Characters are like colors.  Often the best way to draw a character out is to pair it with someone completely opposite.  If your character is best represented by a shade of purple, try pairing her with someone who’s a yellow and watch the sparks fly.

How I use color: When I develop a new character with an acrostic bio card, I tape a paint chip to the back of the card.  The color becomes like a wordless bio for the character, telling me almost as much as the written bio on the other side of the card.

Homework: Field trip!  Next weekend, take a half hour and go to a hardware store to browse the paint aisle.  Most stores give out free paint chip samples so grab a few.  No wait, grab a bunch.  Try to find the perfect paint color to represent your character or your story.  If you’re really ambitious, pick out colors for each of your important characters.  See where the contrasts are, as well as the harmonious combinations.

If you’re really really ambitious, skip the paint store and browse a fabric store instead (where you can play with color as well as pattern and texture).  If you don’t have time to browse the stores, break out the markers, colored pencils or better yet, paints!  Mix and match and play with color.  The point here is to have fun and to look at your characters and story in a new and different way.

What did you discover about your story by playing with color?

8 Comments »

17 Apr

Mood Collage

Posted in Creativity, DIY MFA, Tips, Writing

Remember back in grade school when we used to cut up magazines and glue pictures together to make beautiful artwork?  Well, believe it or not, collaging is actually a great way for writers to explore and express the mood of their project.

I actually learned the benefits of this technique when I was in art school.  “Mood boards” were an integral part of each portfolio presentation and we learned the importance of capturing the essence of a project through imagery.

How do you make a mood collage?  There are no rules.  You can clip pictures from magazines or cut out letters and words in different fonts.  It doesn’t even need to be concrete objects or words; you make a cool background by using printed fabrics or pretty papers.  Use whatever inspires you.  Lay out the pieces in a way that inspires you and move things around until you’ve got a design that you love.  Finally, break out the glue-stick or glue-gun and start sticking the pieces down.

I happen to have Photoshop and I’m into that techie stuff so I actually do my collages digitally.  That way I can print them out in different sizes, email them to people or even post them here on the blog.  To that end, here are a few mood collages I’ve done.  The ones included below are for products I’ve designed, but the same idea applies to mood collages for writing projects.

Mood collage for a road trip project.

Mood collage for a tween fashion project

Mood collage for a project representing the experiences
of girls and women from different cultures.

Homework: Set aside an hour sometime this next week to make a mood collage for your work-in-progress.  Clip pictures from magazines or print images you find online and cut them up.  If you like, while you’re clipping pictures and gluing, listen to some mood music that inspires your story.  The idea with this project is to get completely immersed in the mood of your work-in-progress.

Once you’ve finished your collage, give it a place of honor in your writing space.  You could even take a picture and share with us it on the DIY MFA FB page if you like.  Can’t wait to see what you all come up with!

Now you tell me: what do you do to capture the mood of your current writing project?

3 Comments »

14 Apr

Outline Techniques for Those Who Hate Outlines

Posted in Creativity, DIY MFA, Process, Writing

This past weekend in #diymfa chat, we had a great discussion about outlines and whether we plotted out our stories in detail or wrote by the seat of our pants.  As you can imagine, the responses were as varied as the number of people in the chat.

This discussion got me thinking about my own writing.  I’m not a seat-of-my-pants writer–not even a little–but I hate traditional outlines.  Something about long lists (I.A, 2.b–it’s all Greek to me) just doesn’t work for my visual brain.  I think it’s my background in design that means those outlines are too logical and sequential for me.  To that end, I wanted to share some plotting devices that have worked better for me.  These techniques help me organize my writing without killing the spontaneity.

Mind Mapping

I give a detailed How-To for this technique in the first DIY MFA.  Unlike traditional techniques, this type of outline forces you to look at a topic from multiple different angles. It also makes it easy for you to see an entire project in one glance, rather than having to read through line-by-line to get a sense of the full story.

How to Apply this to Fiction: Try mind-mapping your story or novel by making each of the main branches as chapter topics or major events in the story.  The sub-branches can be scenes that sub-divide these larger branches.  There are no rules with mind-mapping so feel free to doodle and make notes (I use thought bubbles and speech bubbles to add notes to my mind maps, as you can see in the image.)

Here’s a mind map I used to brainstorm the very first DIY MFA back in September.


Story Maps
I love subway maps.  What can I say, I’m a New Yorker so it’s in my blood.  Recently, I started outlining stories using New York-style subway maps.  Just as subway lines intersect, different subplots weave in and out of the main plot thread in a novel or short story.  I like to think of writing as a journey so to me, this idea of mapping out a story works for me.

How to Apply this to Fiction: The different threads in a story are in different colors.  Scenes in each thread are marked as subway stops.  If a scene applies to more than one story thread, then it becomes an intersection.  What I love about this technique is that when I sit down to write a scene, all I’m writing is a “dot” of the story.  Dot’s aren’t big and scary; they’re cute and round.  They’re just dots for crying out loud.  Somehow in my mind, it seems a lot more manageable.

Tip: If the subway concept doesn’t work for you, think of this as a road map instead.  The main story threads are interstates, subplots are smaller roads and the dots are the stops you make along the way.

Here’s a subway map I designed to use for DIY MFA.

Scene Cards

This technique is super-portable, which is one of the reasons I love it.  Take a stack of index cards and make one card for each scene you know needs to happen in your story.  What’s nice about this technique is that you don’t have to write the scenes in order (you can move the cards around), and you can always add more cards later if you think you need them. 

How to Apply this to Fiction: On each card write the following information.

  •  Scene Title: Something easy to remember like “Scene where Jimmy falls from the tree.”
  • Characters: Who’s in this scene?
  • Events: What happens?
  • Setting: Where are we?
  • Purpose: Why do you need this scene? (Character development? Important plot point? Reveal important information?)  This last one is important because if you can’t think of a purpose for the scene then you have to question whether you need the scene at all.

Some computer programs actually have an index card function built in (Scrivener, for instance) which is nice because it makes editing and moving the cards around even easier.  I still like the old-fashioned method because it means I can grab a handful of cards and take it with me anywhere.

Homework: Choose one technique and try it out. Then tell us about it in the comments or on twitter!

13 Comments »

Iggi & Gabi - All rights reserved © 2010-2011

I am a HowJoyful Design by Joy Kelley